Introduction to WebGL and shaders
I recently worked on a project where I needed to use WebGL. I was trying to render many thousands of polygons on a map in the browser, but GeoJSON turned out to be way too slow. To speed things up, I wanted to get down to the lowest level possible, and actually write code that would run directly on the GPU, using WebGL and shaders. I'd always wanted to learn about shaders, but never had the chance, so this was a great opportunity to learn something new while solving a very specific technical challenge.
At first, it was quite the struggle to figure out what I needed to do. Copying and pasting example code often didn't work, and I didn't really get how to go from the examples to the custom solution I needed. However, once I fully understood how it all fit together, it suddenly clicked in my head, and the solution turned out to be surprisingly easy. The hardest part was wrapping my head around some of the concepts. So, I wanted to write up an article explaining what I'd learned, to help you understand those concepts, and hopefully make it easier for you to write your first shader.
In this article, we'll look at how to render an image to the page with over 150 lines of code! Silly, I know, considering we can just use an <img> tag and be done with it. But doing this is a good exercise because it forces us to introduce a lot of important WebGL concepts.
Here's what we'll do in this article:
We'll write two shader programs, to tell the GPU how to turn a list of coordinates into coloured triangles on the screen.
We'll pass the shaders a list of coordinates to tell it where to draw the triangles the screen.
We'll create an "image texture", uploading an image into the GPU so it can paint it onto the triangles.
We'll give the shader a different list of coordinates so it knows which image pixels go inside each triangle.
Hopefully you can use these concepts as a starting point to doing something really cool and useful with WebGL.
Even if you end up using a library to help you with your WebGL code, I find understanding the raw API calls behind the scenes to be useful to know what is actually going on, especially if things go wrong.
Getting started with WebGL
To use WebGL in the browser, you'll need to add a <canvas> tag to the page. With a canvas, you can either draw using the 2D Canvas API, or you can choose to use the 3D WebGL API, either version 1 or 2. (I don't actually understand the difference between WebGL 1 and 2, but I'd like to learn more about that some day. The code and concepts I'll discuss here apply to both versions though.)
If you want your canvas to fill the viewport, you can start with this simple HTML:
<!doctype html>
<html lang="en">
    <meta charset="UTF-8">
    <title>WebGL</title>
    <style>
        html, body, canvas {
            width: 100%;
            height: 100%;
            border: 0;
            padding: 0;
            margin: 0;
            position: absolute;
        }
    </style>
    <body>
        <canvas></canvas>
        <script></script>
    </body>
</html>
That will give you a blank, white, useless page. You'll need some JavaScript to bring it to life. Inside the <script> tag, add these lines to get access to the WebGL API for the canvas:
const canvas = document.querySelector('canvas');
const gl = canvas.getContext('webgl');
Writing your first WebGL shader program
WebGL is based on OpenGL, and uses the same shader language. That's right, shader programs are written in a language of their own, GLSL, which stands for Graphics Library Shader Language.
GLSL reminds me of C or JavaScript, but it has its own quirks and is very limited but also very powerful. The cool thing about it is, it runs right on the GPU instead of in a CPU. So it can do things very quickly that normal CPU programs can't do. It's optimized for dealing with math operations using vectors and matrices. If you remember your matrix math from algebra class, good for you! If you don't, that's ok! You won't need it for this article anyway.
There are two types of shaders we'll need: vertex shaders and fragment shaders. Vertex shaders can do calculations to figure out where each vertex (corner of a triangle) goes. Fragment shaders figure out how to color each fragment (pixel) inside a triangle.
These two shaders are similar, but do different things at different times. The vertex shader runs first, to figure out where each triangle goes, and then it can pass some information along to the fragment shader, so the fragment shader can figure out how to paint each triangle.
Hello, world of vertex shaders!
Here's a basic vertex shader that will take in a vector with an x,y coordinate. A vector is basically just an array with a fixed length. A vec2 is an array with 2 numbers, and a vec4 is an array with 4 numbers. So, this program will take a global "attribute" variable, a vec2 called "points" (which is a name I made up).
It will then tell the GPU that that's exactly where the vertex will go by assigning it to another global variable built into GLSL called gl_Position.
It will run for each pair of coordinates, for each corner of each triangle, and points will have a different x,y value each time. You'll see how we define and pass those coordinates later on.
Here's our first "Hello, world!" vertex shader program:
attribute vec2 points;

void main(void) {
    gl_Position = vec4(points, 0.0, 1.0);
}
No calculation was involved here, except we needed to turn the vec2 into a vec4. The first two numbers are x and y, the third is z, which we'll just set to 0.0 because we're drawing a 2-dimensional picture and we don't need to worry about the third dimension. (I don't know what the fourth value is, but we just set it to 1.0. From what I've read, I think it has something to do with making matrix math easier.)
I like that in GLSL, vectors are a basic data type, and you can easily create vectors using other vectors. We could have written the line above like this:
gl_Position = vec4(points[0], points[1], 0.0, 1.0);but instead, we were able to use a shortcut and just pass the vec2 points in as a the first argument, and GLSL figured out what to do. It reminds me of using the spread operator in JavaScript:
// javascript
gl_Position = [...points, 0.0, 1.0];
So if one of our triangle corners had an x of 0.2 and a y of 0.3, our code would effectively be doing this:
gl_Position = vec4(0.2, 0.3, 0.0, 1.0);but we can't just hardcode the x and y coordinates into our program like this, or all the triangles would just be a single point on the screen. We use the attribute vector instead so that each corner (or vertex) can be in a different place.
Colouring our triangles with a fragment shader
While vertex shaders run once for each corner of each triangle, fragment shaders run once for each coloured pixel inside each triangle.
Whereas vertex shaders define the position of each vertex using a global vec4 variable called gl_Position, fragment shaders work by defining the colour of each pixel with a different global vec4 variable called gl_FragColor. Here's how we can fill all our triangles with red pixels:
void main() {
    gl_FragColor = vec4(1.0, 0.0, 0.0, 1.0);
}
The vector for a colour here is RGBA, so a number between 0 and 1 for each of red, green, blue and alpha. So the example above just sets each fragment or pixel to bright red with full opacity.
Accessing an image inside your shaders
You wouldn't normally fill all your triangles with the same solid colour, so instead, we want the fragment shader to reference an image (or "texture") and pull out the right colour for each pixel inside our triangles.
We need to access both the texture with the color information, as well as some "texture coordinates" that tell us how the image maps onto the shapes.
First, we'll modify the vertex shader to access the coordinates and pass them on to the fragment shader:
attribute vec2 points;
attribute vec2 texture_coordinate;

varying highp vec2 v_texture_coordinate;

void main(void) {
    gl_Position = vec4(points, 0.0, 1.0);
    v_texture_coordinate = texture_coordinate;
}
If you're like me, you're probably worried there will be all sorts of crazy trigonometry needed, but don't worry - it turns out to be the easiest part, thanks to the magic of the GPU.
We take in a single texture coordinate for each vertex, but then we pass it on to the fragment shader in a varying variable, which will "interpolate" the coordinates for each fragment or pixel. This is essentially a percentage along both dimensions, so that for any particular pixel inside the triangle, we'll know exactly which pixel of the image to choose.
The image is stored in a 2-dimensional sampler variable called sampler. We receive the varying texture coordinate from the vertex shader, and use a GLSL function called texture2D to sample the appropriate single pixel from our texture.
It sounds complex but turns out to be super easy thanks to the magic of the GPU. The only part where we need to do any math is associating each vertex coordinate of our triangles with the coordinates of our image, and we'll see later that it turns out to be pretty easy.
precision highp float;
varying highp vec2 v_texture_coordinate;
uniform sampler2D sampler;

void main() {
    gl_FragColor = texture2D(sampler, v_texture_coordinate);
}
Compiling a program with two shaders
We've just looked at how to write two different shaders using GLSL, but we haven't talked about how you would even do that within JavaScript. You simply need to get these GLSL shaders into JavaScript strings, and then we can use the WebGL API to compile them and put them on the GPU.
Some people like to put shader source code directly in the HTML using script tags like <script type="x-shader/x-vertex">, and then pull out the code using innerText. You could also put the shaders into separate text files and load them with fetch. Whatever works for you.
I find it easiest to just write the shader source code directly in my JavaScript with template strings. Here's what that looks like:
const vertexShaderSource = `
    attribute vec2 points;
    attribute vec2 texture_coordinate;

    varying highp vec2 v_texture_coordinate;

    void main(void) {
        gl_Position = vec4(points, 0.0, 1.0);
        v_texture_coordinate = texture_coordinate;
    }
`;

const fragmentShaderSource = `
    precision highp float;
    varying highp vec2 v_texture_coordinate;
    uniform sampler2D sampler;

    void main() {
        gl_FragColor = texture2D(sampler, v_texture_coordinate);
    }
`;
Next, we need to create a GL "program" and add those two different shaders to it like this:
// create a program (which we'll access later)
const program = gl.createProgram();

// create a new vertex shader and a fragment shader
const vertexShader = gl.createShader(gl.VERTEX_SHADER);
const fragmentShader = gl.createShader(gl.FRAGMENT_SHADER);

// specify the source code for the shaders using those strings
gl.shaderSource(vertexShader, vertexShaderSource);
gl.shaderSource(fragmentShader, fragmentShaderSource);

// compile the shaders
gl.compileShader(vertexShader);
gl.compileShader(fragmentShader);

// attach the two shaders to the program
gl.attachShader(program, vertexShader);
gl.attachShader(program, fragmentShader);
Lastly, we have to tell GL to link and use the program we just created. Note, you can only use one program at a time:
gl.linkProgram(program);
gl.useProgram(program);
If something went wrong with our program, we should log the error to the console. Otherwise, it will silently fail:
if (!gl.getProgramParameter(program, gl.LINK_STATUS)) {
    console.error(gl.getProgramInfoLog(program));
}
As you can see, the WebGL API is very verbose. But if you look through these lines carefully, you'll see they're not doing anything too surprising. These chunks of code are perfect for copying and pasting, because it's hard to memorize them and they rarely change. The only part you might need to change is the shader source code in the template strings.
Drawing triangles
Now that we have our program all wired up, it's time to feed it some coordinates and get it to draw some triangles on the screen!
First, we need to understand the default coordinate system for WebGL. It's quite different from your regular pixel coordinate system on the screen. In WebGL, the center of the canvas is 0,0, top-left is -1,-1, and bottom right is 1,1.
If we want to render a photograph, we need to have a rectangle. But WebGL only knows how to draw triangles. So how do we draw a rectangle using triangles? We can use two triangles to create a rectangle. We'll have one triangle cover the top left corner, and another in the bottom right, like this:

To draw triangles, we'll need to specify where the coordinates of the three corners of each triangle are. Let's create an array of numbers. Both the x & y coordinates of both triangles will all be in a single array, like this:
const points = [
    // first triangle
    // top left
    -1, -1,

    // top right
    1, -1,

    // bottom left
    -1, 1,

    // second triangle
    // bottom right
    1, 1,

    // top right
    1, -1,

    // bottom left
    -1, 1,
];
To pass a list of numbers into our shader program, we have to create a "buffer", then load an array into the buffer, then tell WebGL to use the data from the buffer for the attribute in our shader program.
We can't just load a JavaScript array into the GPU, it has to be strictly typed. So we wrap it in a Float32Array. We could also use integers or whatever type makes sense for our data, but for coordinates, floats make the most sense.
// create a buffer
const pointsBuffer = gl.createBuffer();

// activate the buffer, and specify that it contains an array
gl.bindBuffer(gl.ARRAY_BUFFER, pointsBuffer);

// upload the points array to the active buffer
// gl.STATIC_DRAW tells the GPU this data won't change
gl.bufferData(gl.ARRAY_BUFFER, new Float32Array(points), gl.STATIC_DRAW);
Remember, I made an attribute called "points" at the top of our shader program, with the line attribute vec2 points;? Now that our data is in the buffer, and the buffer is active, we can fill that "points" attribute with the coordinates we need:
// get the location of our "points" attribute in our shader program
const pointsLocation = gl.getAttribLocation(program, 'points');

// pull out pairs of float numbers from the active buffer
// each pair is a vertex that will be available in our vertex shader
gl.vertexAttribPointer(pointsLocation, 2, gl.FLOAT, false, 0, 0);

// enable the attribute in the program
gl.enableVertexAttribArray(pointsLocation);
Loading an image into a texture
In WebGL, textures are a way to provide a bunch of data in a grid that can be used to paint pixels onto shapes. Images are an obvious example, they are a grid of red, blue, green & alpha values along rows and columns. But, you can use textures for things that aren't images at all. Like all information in a computer, it ends up being nothing other than lists of numbers.
Since we're in the browser, we can use regular JavaScript code to load an image. Once the image has loaded, we'll use it to fill the texture.
It's probably easiest to load the image first before we do any WebGL code, and then run the whole WebGL initialization stuff after the image has loaded, so we don't need to wait on anything, like this:
const img = new Image();
img.src = 'photo.jpg';
img.onload = () => {
    // assume this runs all the code we've been writing so far
    initializeWebGLStuff();
};
Now that our image has loaded, we can create a texture and upload the image data into it.
// create a new texture
const texture = gl.createTexture();

// specify that our texture is 2-dimensional
gl.bindTexture(gl.TEXTURE_2D, texture);

// upload the 2D image (img) and specify that it contains RGBA data
gl.texImage2D(gl.TEXTURE_2D, 0, gl.RGBA, gl.RGBA, gl.UNSIGNED_BYTE, img);
Since our image is probably not a square with power-of-two dimensions, we also have to tell WebGL how to choose which pixels to draw when enlarging or shrinking our image, otherwise it will throw an error.
// tell WebGL how to choose pixels when drawing our non-square image
gl.texParameteri(gl.TEXTURE_2D, gl.TEXTURE_WRAP_S, gl.CLAMP_TO_EDGE);
gl.texParameteri(gl.TEXTURE_2D, gl.TEXTURE_WRAP_T, gl.CLAMP_TO_EDGE);
gl.texParameteri(gl.TEXTURE_2D, gl.TEXTURE_MIN_FILTER, gl.LINEAR);

// bind this texture to texture #0
gl.activeTexture(gl.TEXTURE0);
gl.bindTexture(gl.TEXTURE_2D, texture);
Lastly, we want to access this texture in our shader program. We defined a 2-dimensional uniform sampler variable with the line uniform sampler2D sampler;, so let's tell the GPU that our new texture should be used for that.
// use the texture for the uniform in our program called "sampler",
gl.uniform1i(gl.getUniformLocation(program, 'sampler'), 0);
Painting triangles with an image using texture coordinates
We're almost done! The next step is very important. We need to tell our shaders how and where our image should be painted onto our triangles. We want the top left corner of our image to be painted in the top left corner of our top left triangle. And so on.
Image textures have a different coordinate system than our triangles used, so we have to think a little bit about this, and can't just use the exactly same coordinates unfortunately. Here's how they differ:
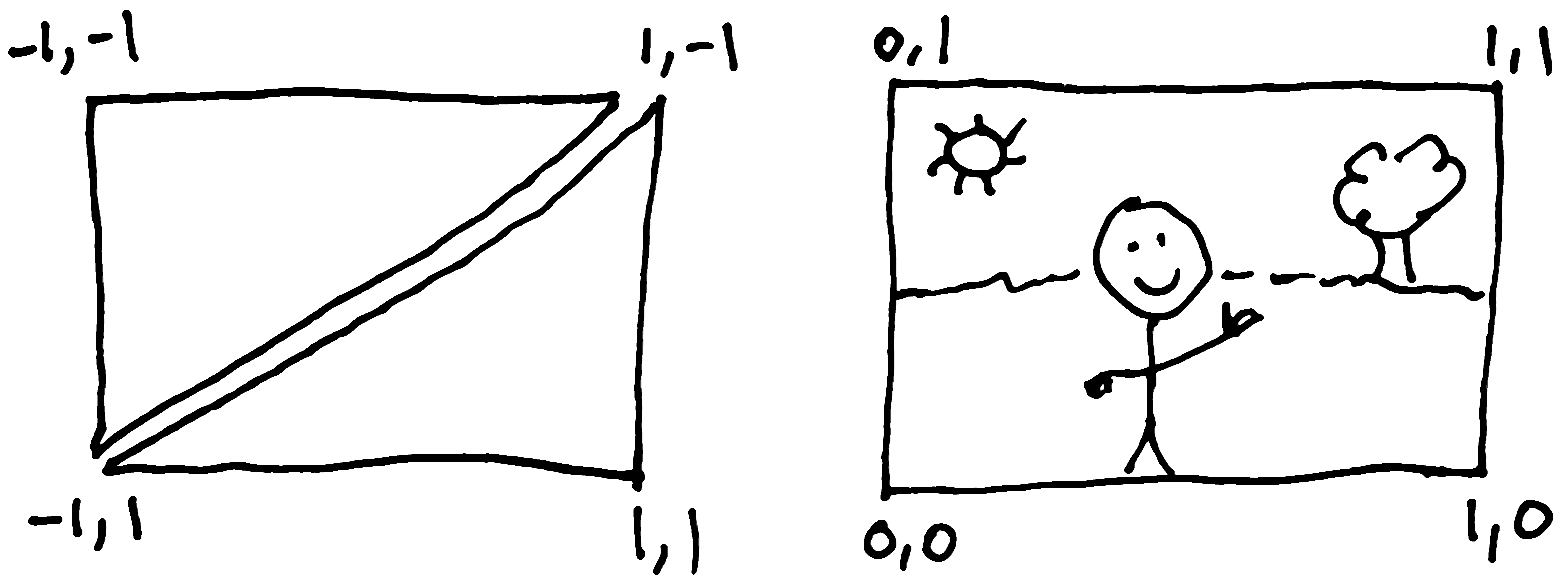
The texture coordinates should be in the exact same order as our triangle vertex coordinates, because that's how they will show up together in the vertex shader. As our vertex shader runs for each vertex, it will also be able to access each texture coordinate, and pass that along to the fragment shader as a varying variable.
We'll use almost the same code we used to upload our array of triangle coordinates, except now we'll be associating it with the attribute called "texture_coordinate".
const textureCoordinates = [
    // first triangle
    // top left
    0, 1,

    // top right
    1, 1,

    // bottom left
    0, 0,

    // second triangle
    // bottom right
    1, 0,

    // top right
    1, 1,

    // bottom left
    0, 0,
];

// same stuff we did earlier, but passing different numbers
const textureCoordinateBuffer = gl.createBuffer();
gl.bindBuffer(gl.ARRAY_BUFFER, textureCoordinateBuffer);
gl.bufferData(gl.ARRAY_BUFFER, new Float32Array(textureCoordinates), gl.STATIC_DRAW);

// and associating it with a different attribute
const textureCoordinateLocation = gl.getAttribLocation(program, 'texture_coordinate');
gl.vertexAttribPointer(textureCoordinateLocation, 2, gl.FLOAT, false, 0, 0);
gl.enableVertexAttribArray(textureCoordinateLocation);
Last step, draw some triangles
Now that we have our shaders and all our coordinates and our image loaded in the GPU, we're ready to actually run our shader program and have it draw our image onto the canvas.
To do that, we just need one line of code:
gl.drawArrays(gl.TRIANGLES, 0, 6);This tells WebGL to draw triangles using both our points array and the texture coordinates array. The number 6 here means that every 6 numbers in our arrays defines one triangle. Each triangle has 3 corners with an x and y coordinate associated with each corner (or vertex).
See the code live on CodePen.io
Just the beginning?
Isn't it amazing how many different things you need to learn to draw an image using the GPU? I found it to be a huge learning curve, but once I wrapped my head around what shaders actually do, what textures are, and how to provide shaders with some lists of numbers, and how it all fits together, it started to make sense and I realised how powerful it all is.
I hope you've been able to get a glimpse of some of that simplicity and power. I know the WebGL API can be very painfully verbose, and I'm still not totally sure what every function does exactly, and It's definitely a new programming paradigm for me, because a GPU is so different from a CPU, but that's what makes it so exciting.